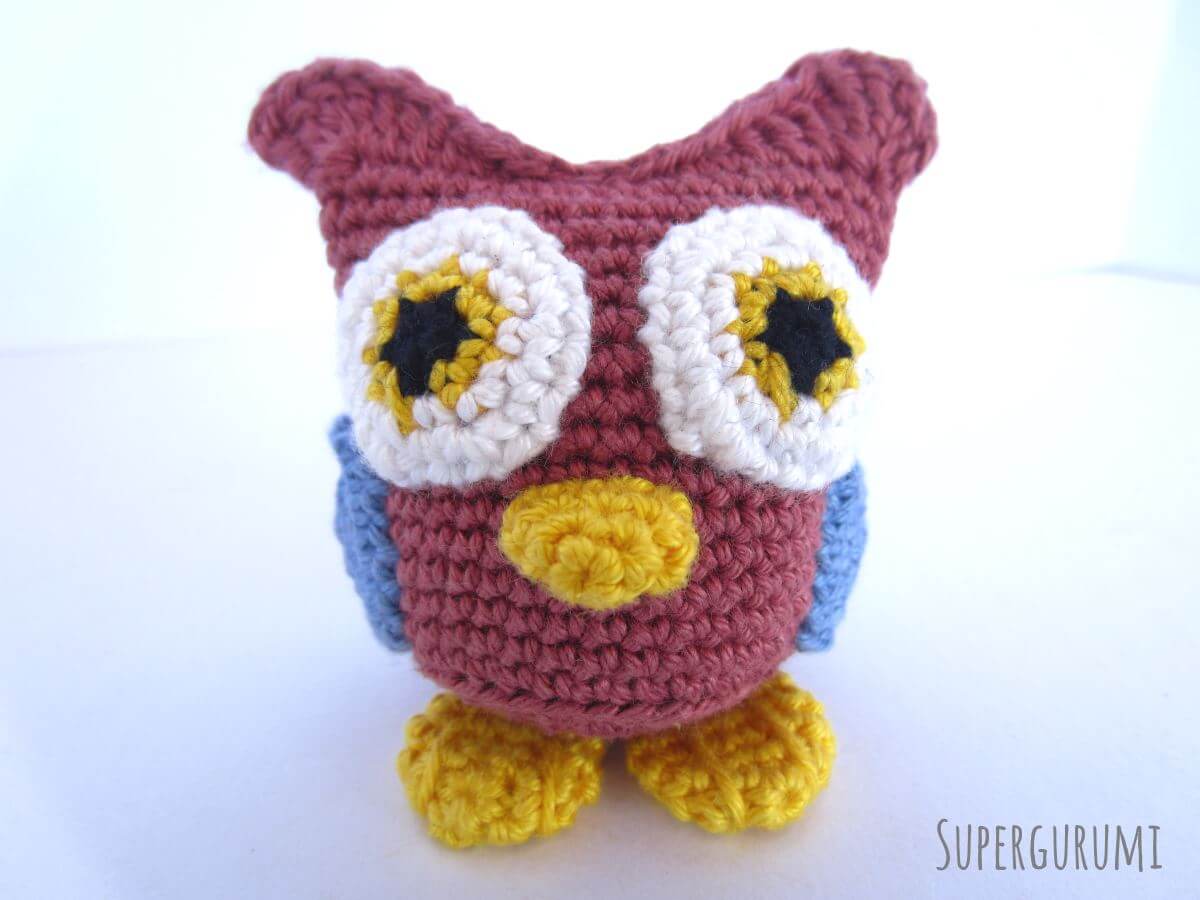
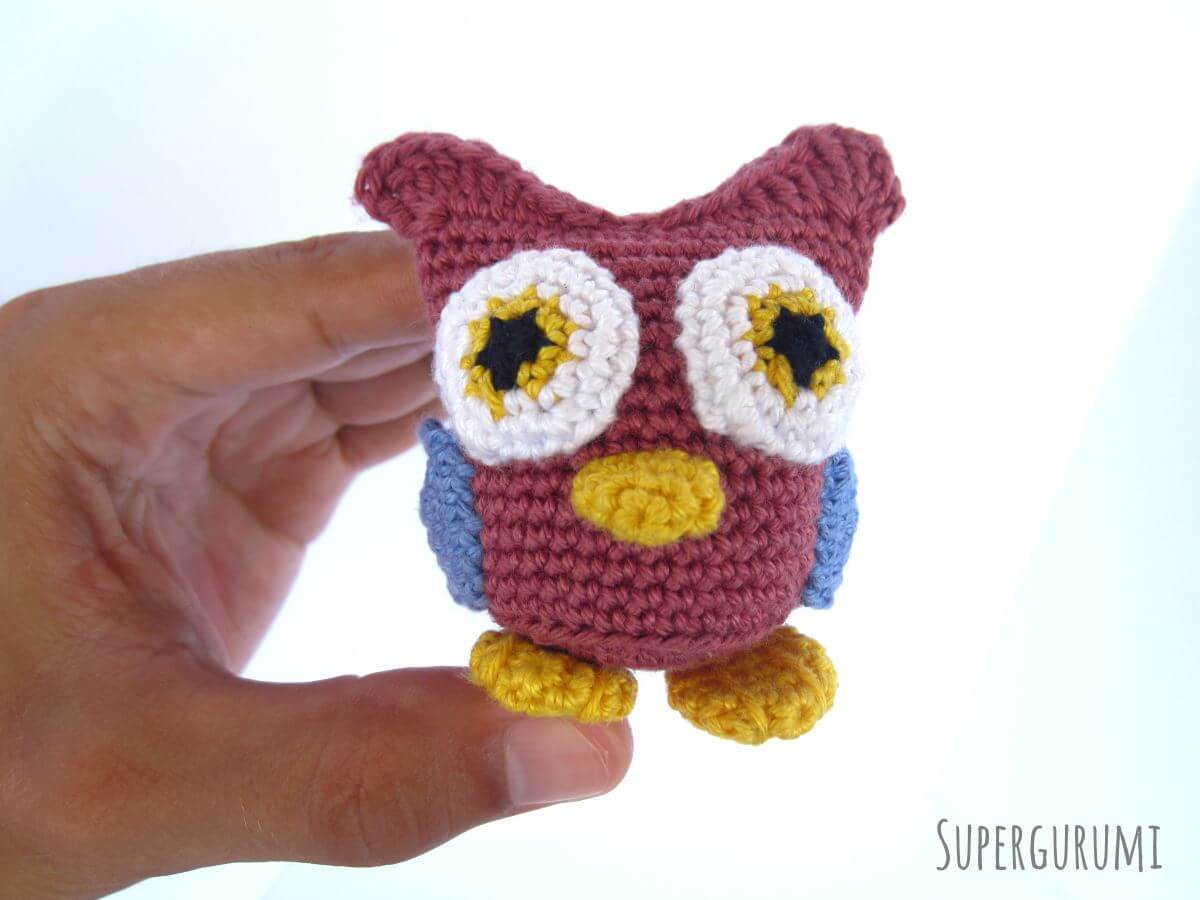
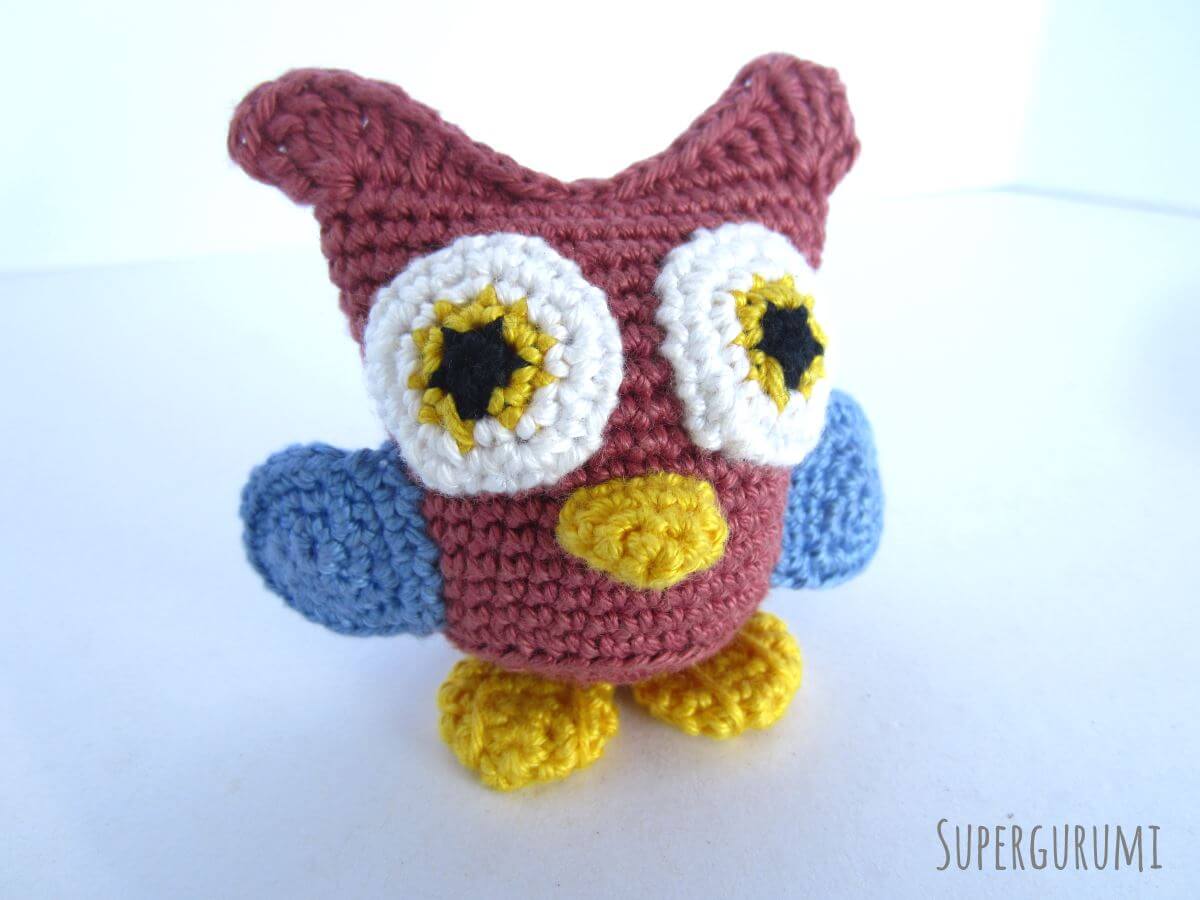
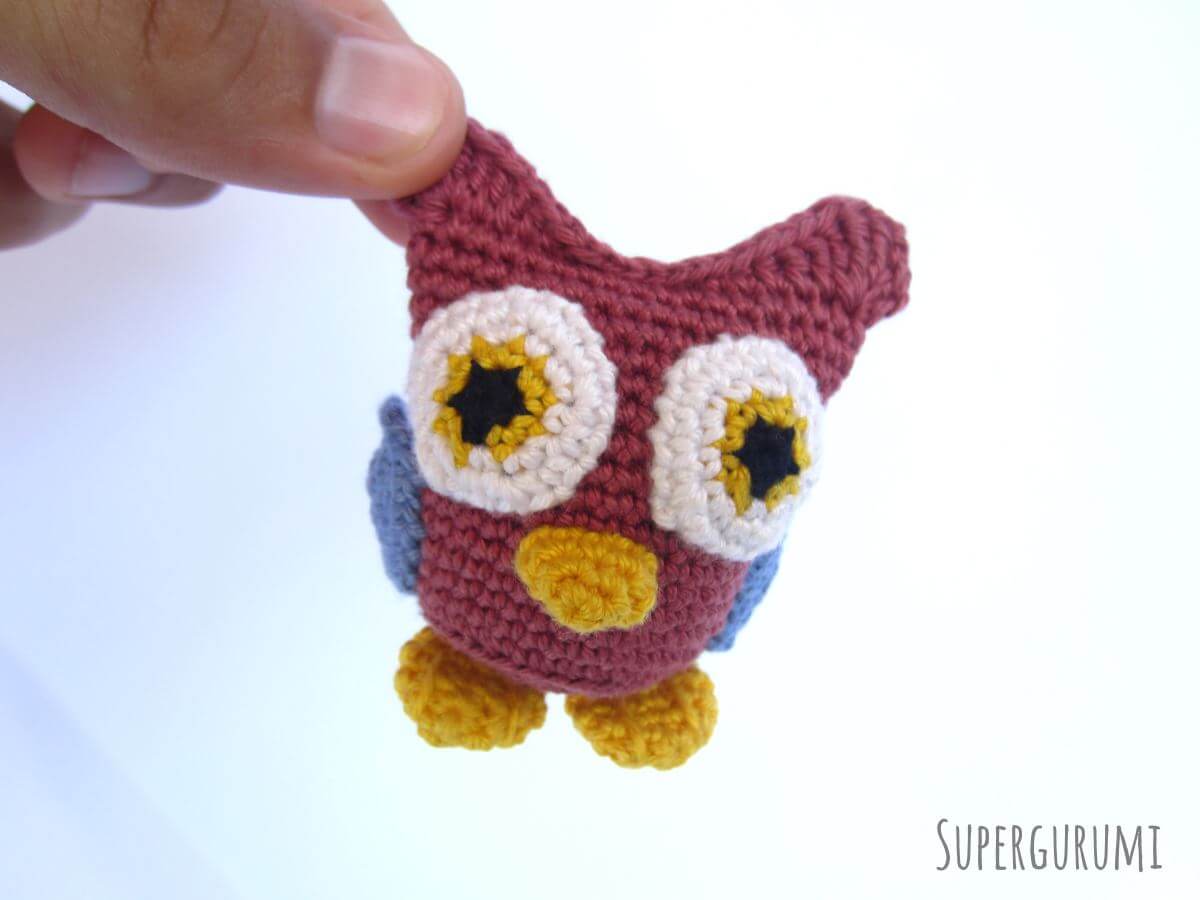
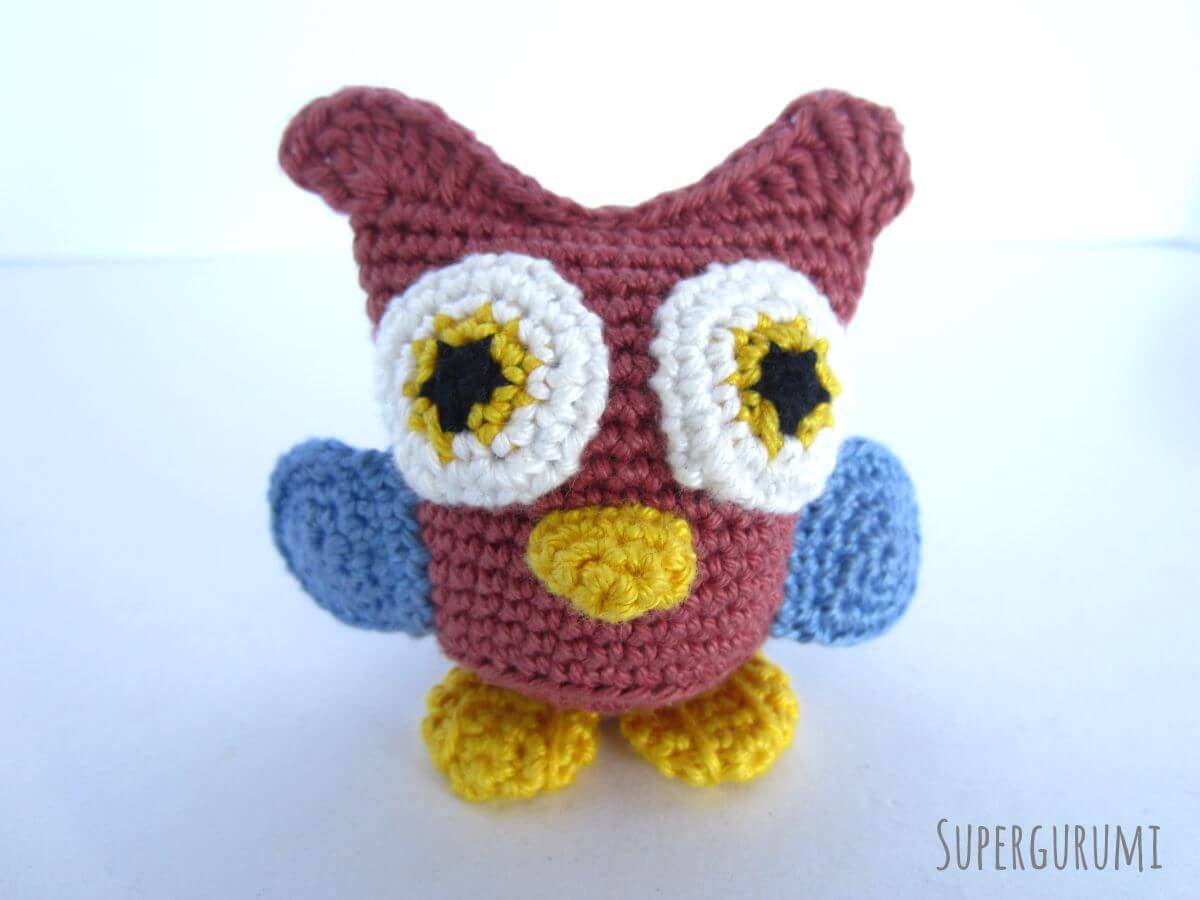
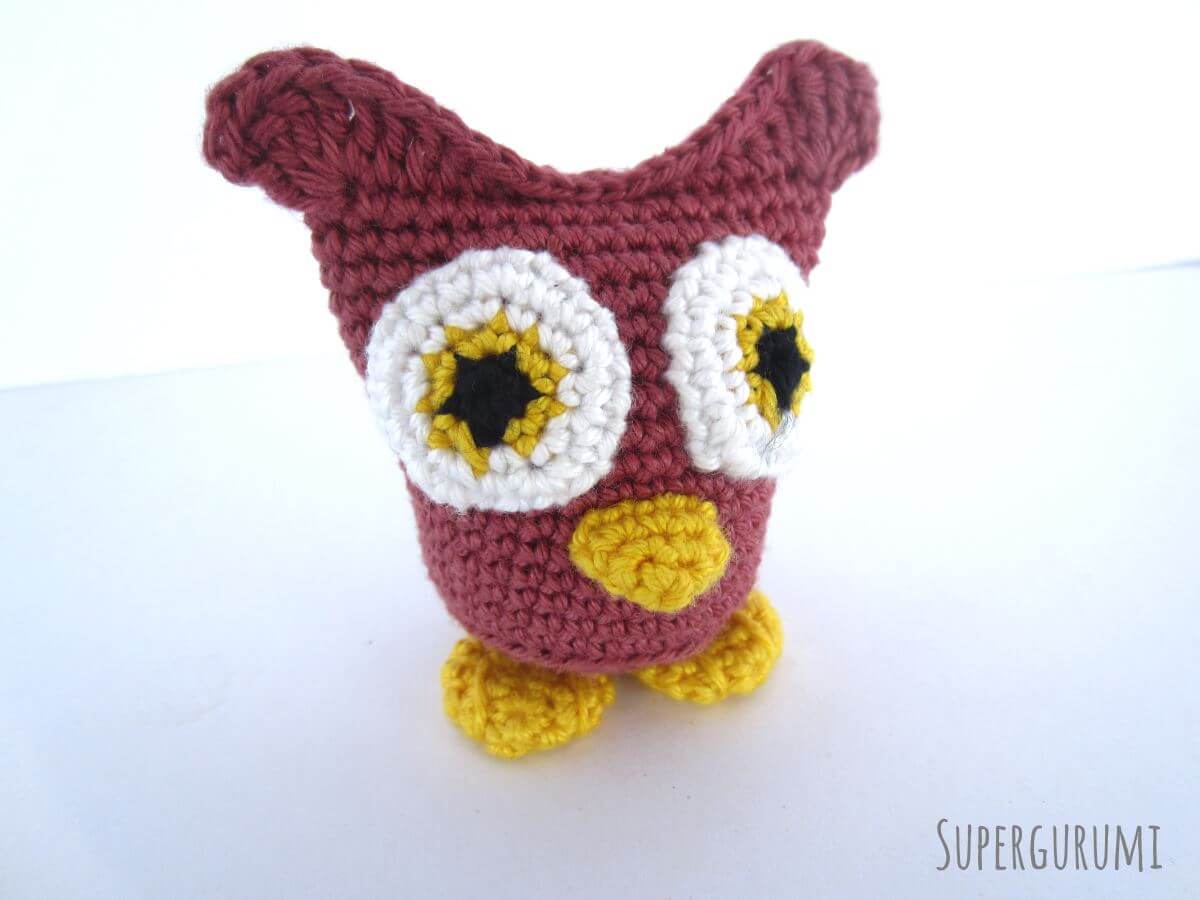
The Owl, nocturnal, mysterious, graceful and at home everywhere on earth except on Antarctica. The owl is not only home in the wild but now also in your own four walls, thanks to this easy and detailed Amigurumi Owl Crochet Pattern.
The crochet owl is crocheted in spiral rounds and mainly with single crochet stitches and looks good in all colors.
The here depicted crochet owl is crocheted using the “Schachenmayr Catania” yarn and a 2.5 mm crochet hook. The finished owl has a height of 8 cm (3.14 inch) and a width of 7 cm (2.75 inch). Using a bigger yarn and/or crochet hook let you create a bigger owl.


Owl Crochet Pattern
Needed Techniques
- Magic Ring
- Chain Stitch
- Slip Stitch
- Single Crochet Stitch (SC)
- Half Double Crochet Stitch
- Double Crochet Stitch
- Treble Crochet Stitch
- Increase
- Decrease
- Weave In / Sew On
Needed Materials and Tools
- Yarn Colors: Red yarn for the body, black and white for the eyes, yellow for the beak, the iris and the feet and blue for the wings.
- 2.5 mm Crochet Hook
- blunt Tapestry Needle
- Polyfill and Scissor
- This pattern was crocheted using the “Schachenmayr Catania” yarn in the following colors: marsalarot/rose (# 396), schwarz/black (# 110), weiß/white (# 106), gold/gold (# 249), wolke/sky (# 247)
IMPORTANT: This crochet pattern is crocheted in spiral rounds, means, you keep crocheting without joining rounds unless said otherwise. Always work a marker of any kind in the first stitch of each new round, to know when a round begins and/or ends.
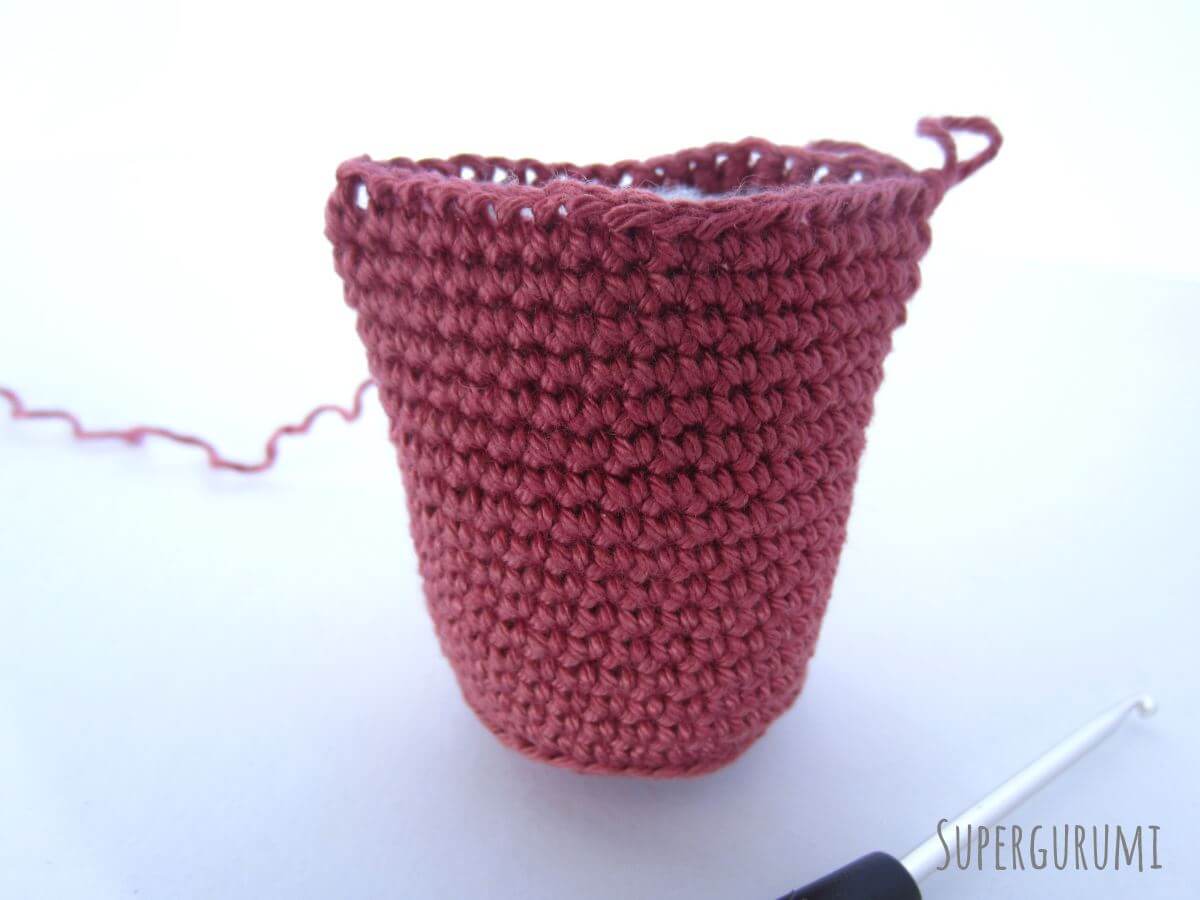
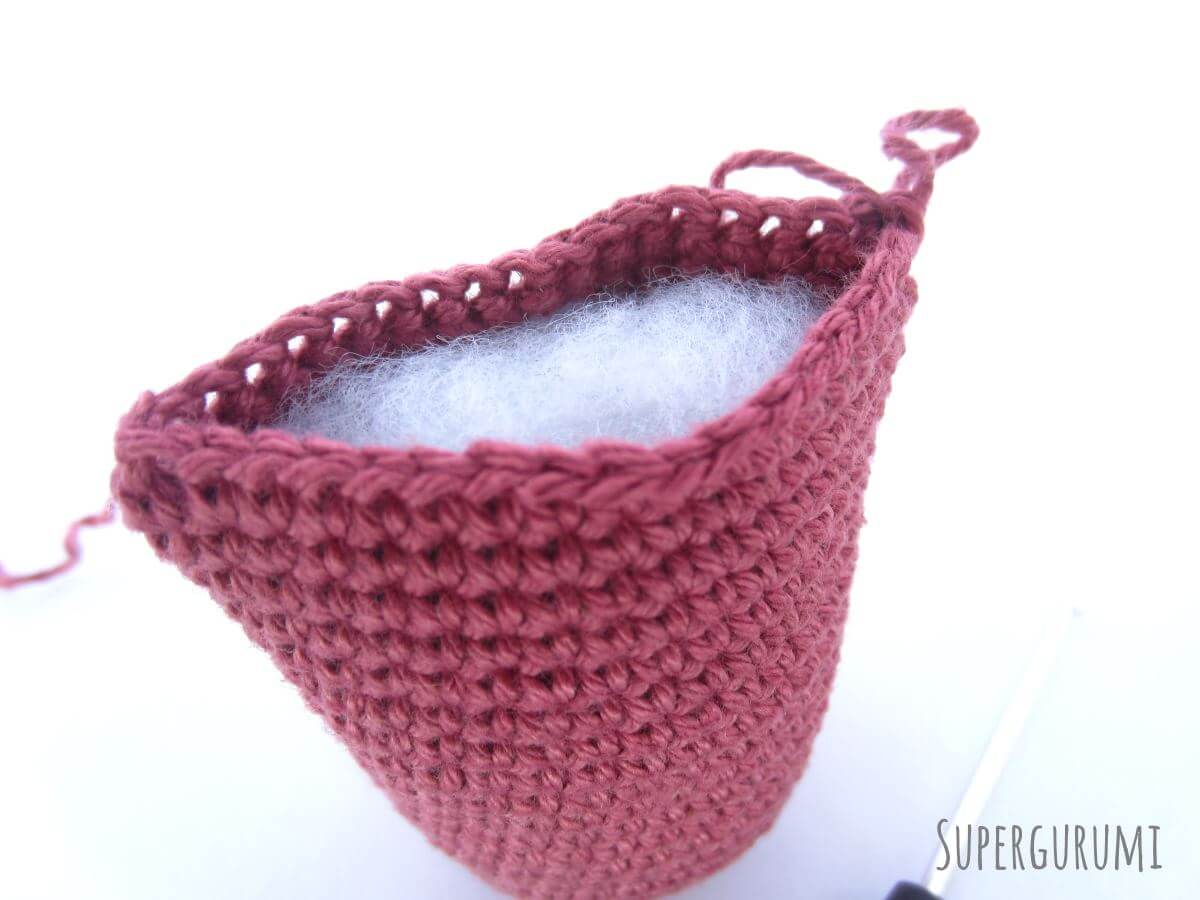
Crochet the Owl Body
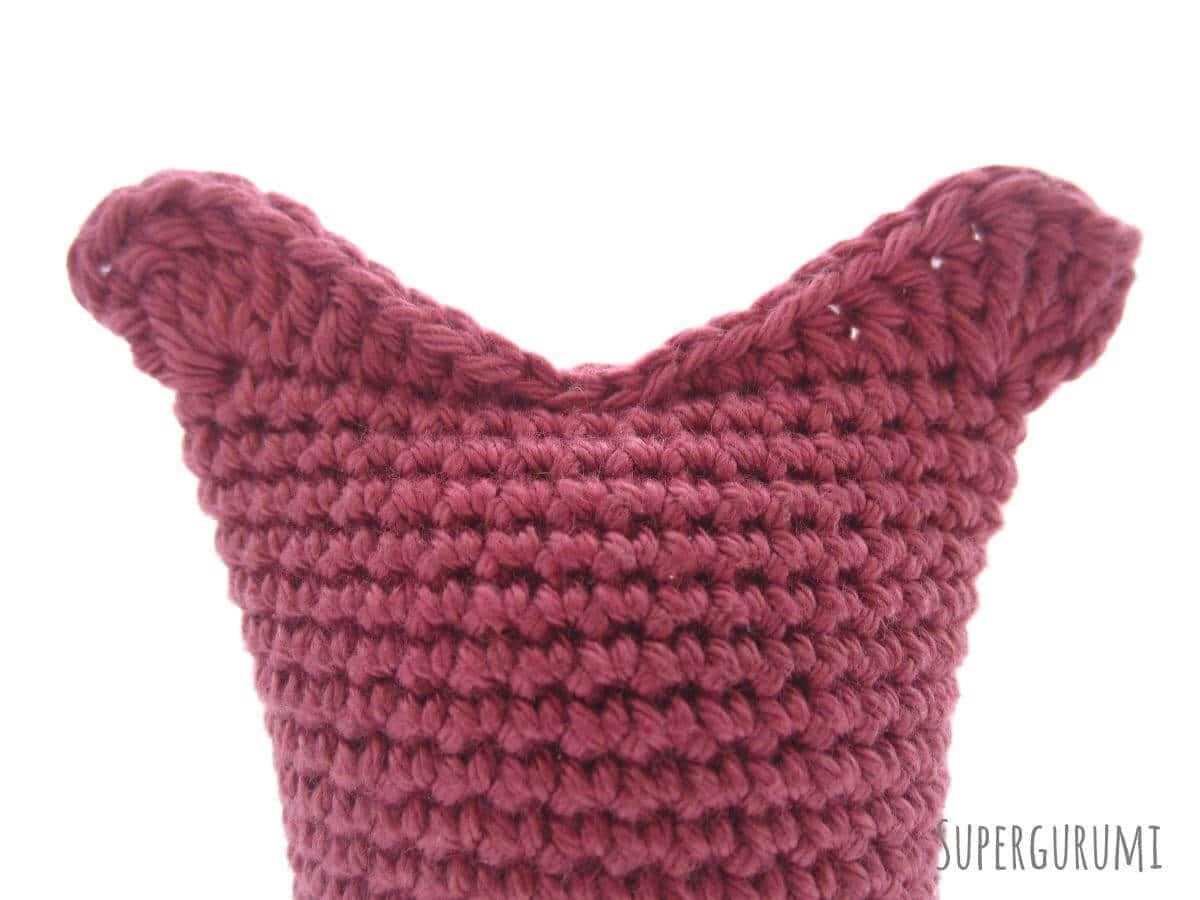
The crochet owl body is crocheted in spiral rounds with single crochet stitches. In Round 7 you have to crochet only into the back loops, the back loop is the loop on top of a stitch laying in the rear. No sewing needed to close the body, it is closed by crocheting the opening together with different stitches.

Use the check boxes to mark your finished rounds, rows and steps.
- You start making a Magic Ring using the red yarn.
- 1. Round: 6 SC into Magic Ring. (6 stitches)
- 2. Round: [ 2 SC into each stitch. ] Repeat from [ to ] till end of round. (12 stitches)
- 3. Round: [ 1 SC, 2 SC into next stitch. ] Repeat from [ to ] till end of round. (18 stitches)
- 4. Round: 1 SC. 2 SC into next stitch. [ 2 SC, 2 SC into next stitch. ] Repeat from [ to ] 5 times. 1 SC. (24 stitches)
- 5. Round: [ 3 SC, 2 SC into next stitch. ] Repeat from [ to ] till end of round. (30 stitches)
- 6. Round: 2 SC, 2 SC into next stitch. [ 4 SC, 2 SC into next stitch. ] Repeat from [ to ] 5 times. 2 SC. (36 stitches)
- 7. Round: 36 SC only into the back loop. The back loops is the loop of the two loops on top of a stitch that lays at the rear, away from you. (36 stitches)
- 8. – 22. Round: 15 rounds, each round 36 SC. Do not cut the yarn after crocheting all rounds but fill the body of the owl with a good amount of polyfill. (36 stitches)
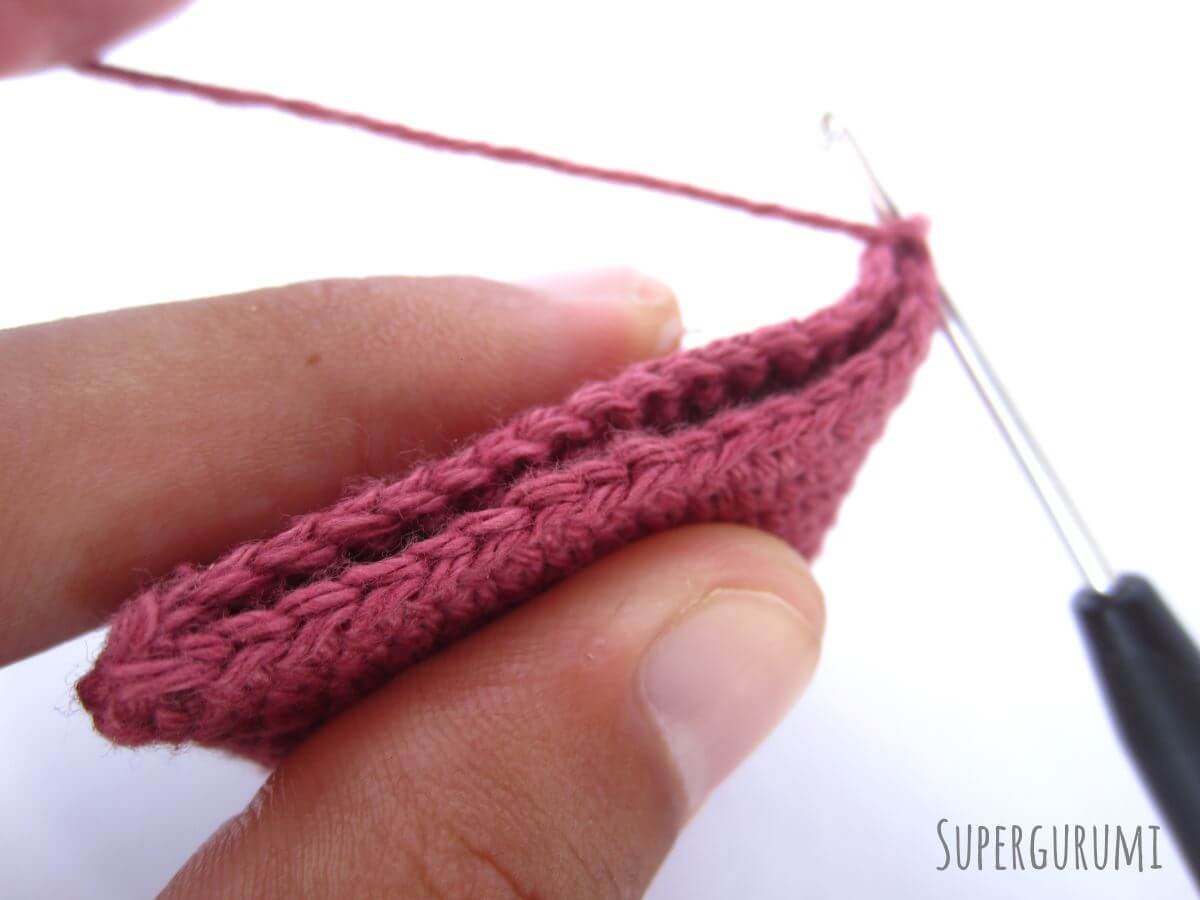
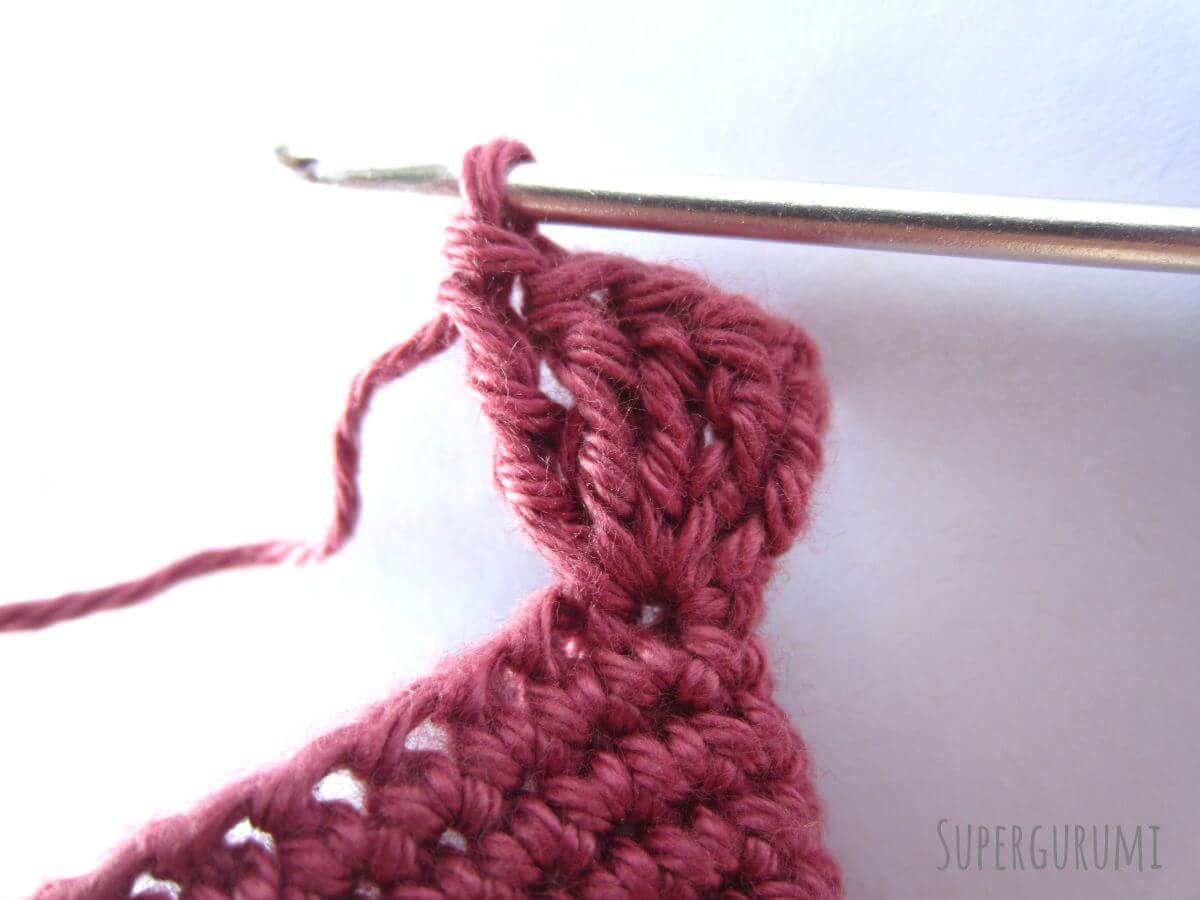
- Finish: Press the opening of the body together, so that both rows of stitches lay parallel to each other while the last crocheted stitch is the most right one (see picture). Crochet 4 chain stitches. Next you crochet 1 ttreble crochet stitch but through 2 stitches. To do that, first yarn over 2 times, psuh the hook through the next stitch AND the stitch opposite that first stitch (but not the stitch that is connected to the chain you just crocheted), yarn over and crochet 1 treble crochet stitch. Crochet 3 more treble crochet stitches into the same stitch you just crocheted the first treble crochet stitch.
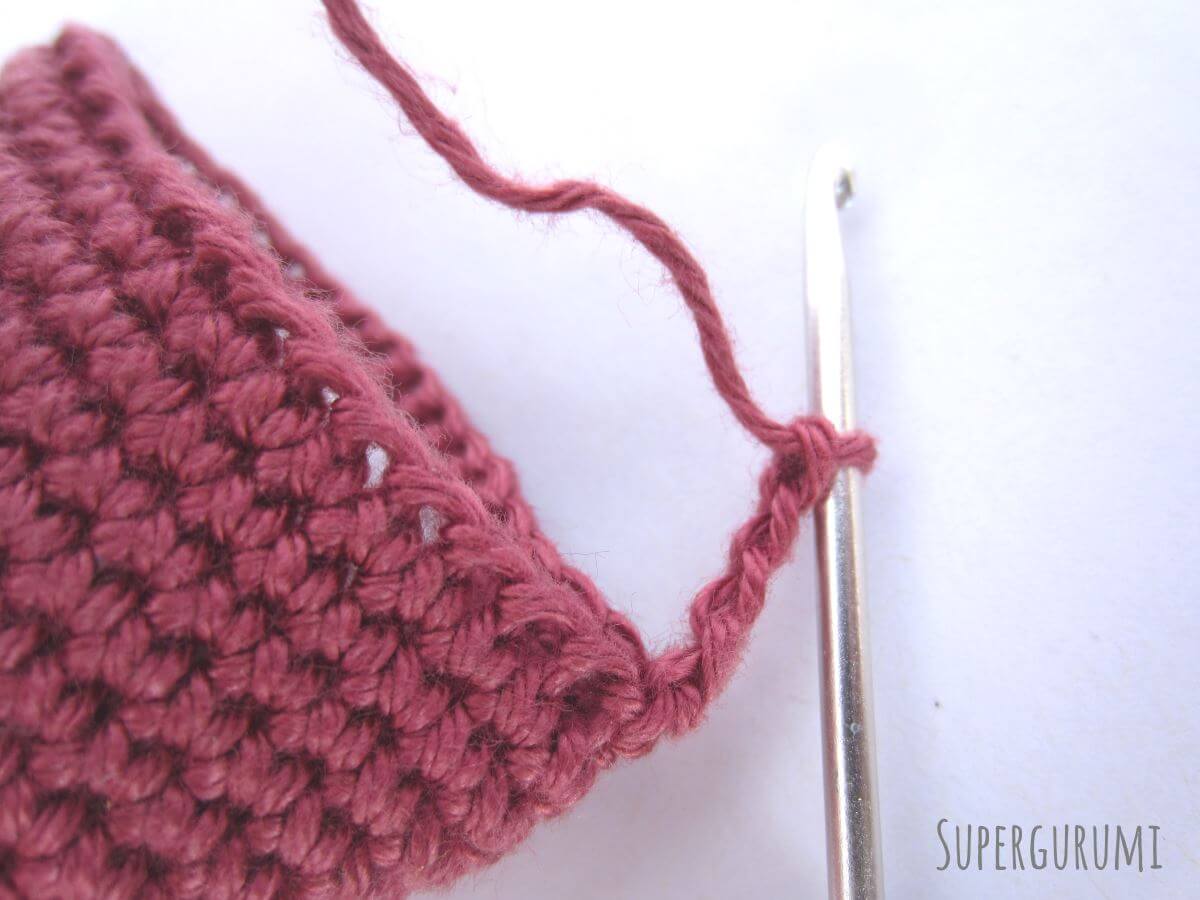


- Continue crocheting the following stitches always together into the next stitch AND the stitch opposite (let us call them “connected stitches”).
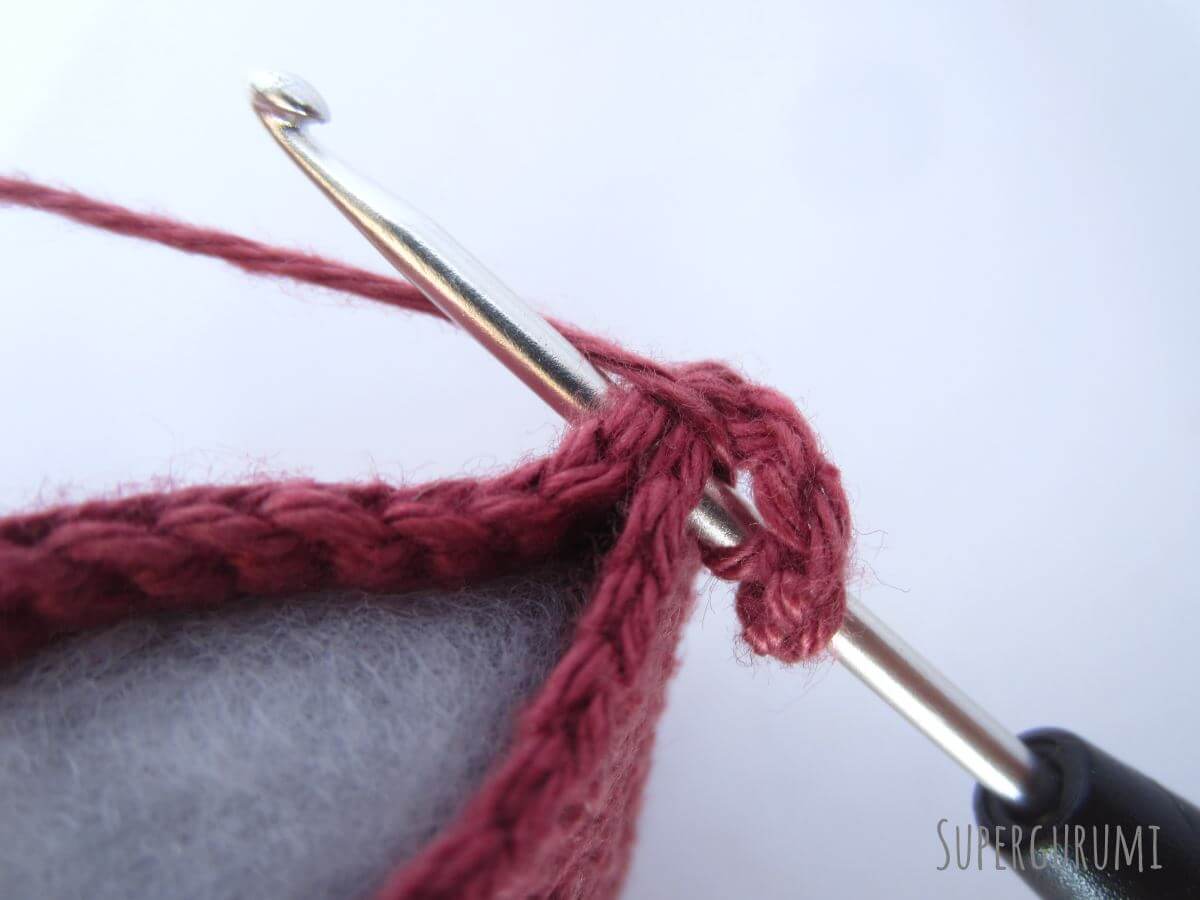
- 1 double crochet stitch into the next 2 connected stitches.
- 1 half double crochet into the next 2 connected stitches.
- 1 SC into the next 2 connected stitches.
- 1 slip stitch into the next 3 connected stitches.
- 1 SC into the next 2 connected stitches.
- 1 half double crochet into the next 2 connected stitches.
- 1 double crochet stitch into the next 2 connected stitches.
- 5 treble crochet stitches into the last connected stitch.
- Cut the yarn and weave in the leftover thread.
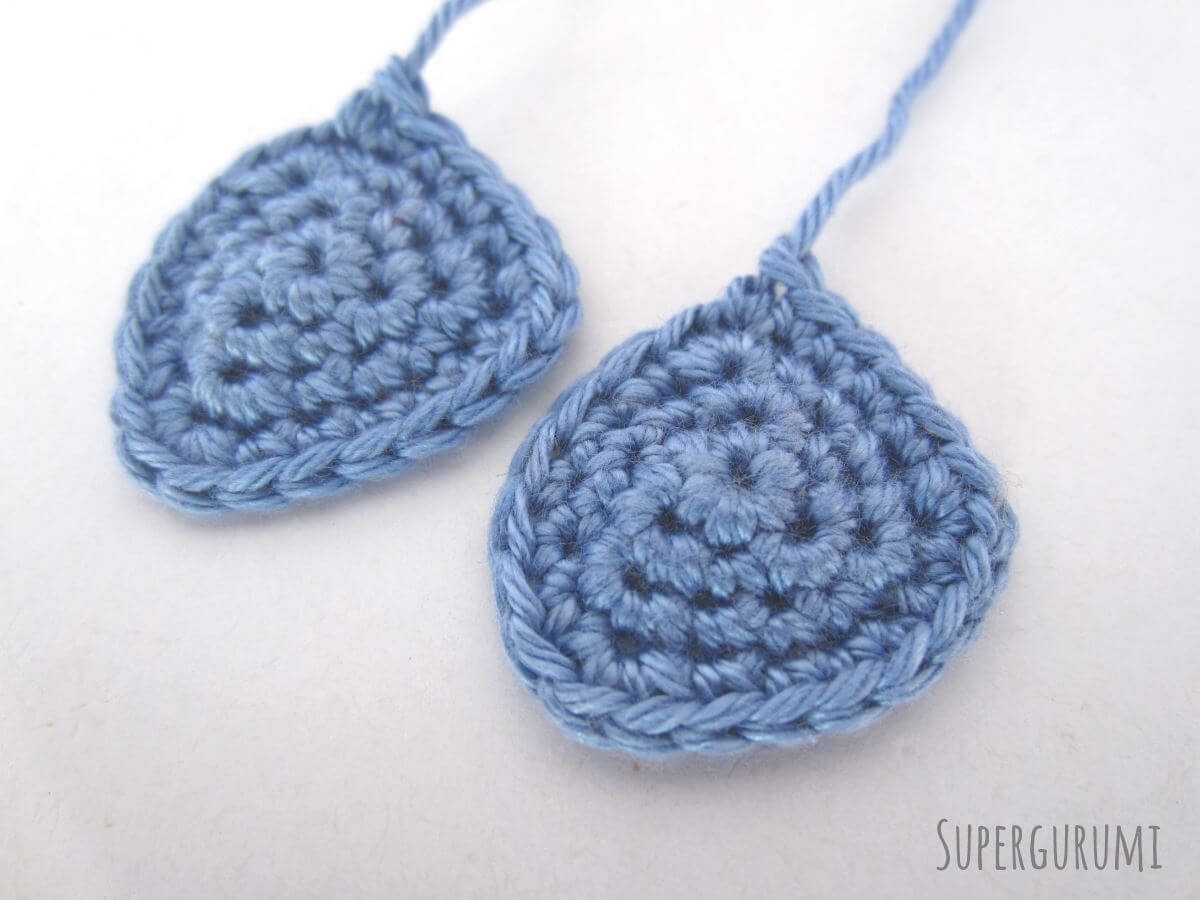
Crochet the Owl Eyes (2 pieces)
The owl eyes are crocheted in spiral rounds with single crochet stitches. Crochet 2 owl eyes.
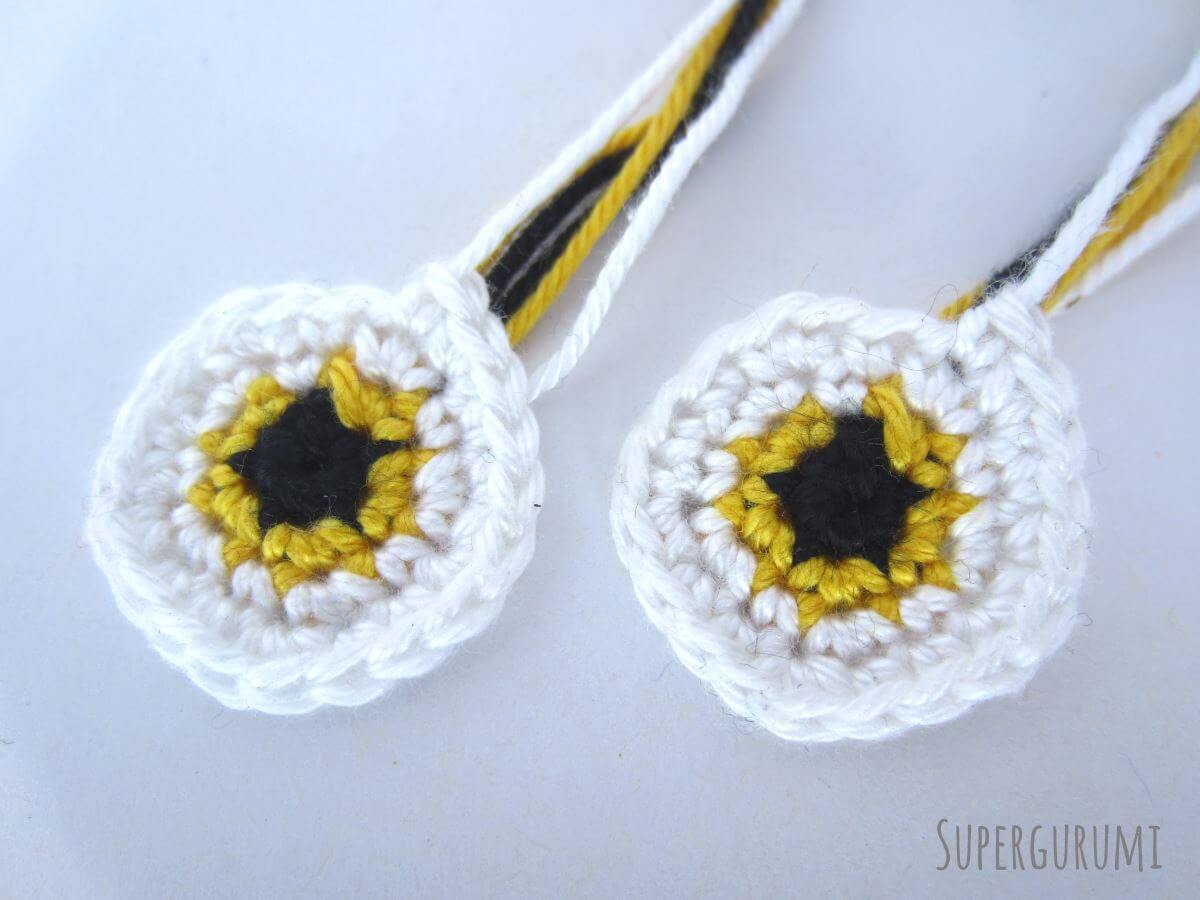
- You start making a Magic Ring using the black yarn.
- 1. Round: 5 SC into Magic Ring. (5 stitches)
- 2. Round: Color change to yellow. [ 2 SC into each stitch. ] Repeat from [ to ] till end of round. (10 stitches)
- 3. Round: Color change to white. [ 1 SC, 2 SC into next stitch. ] Repeat from [ to ] till end of round. (15 stitches)
- 4. Round: 1 SC, 2 SC into next stitch. [ 2 SC, 2 SC into next stitch. ] Repeat from [ to ] 4 times. 1 SC. (20 stitches)
- Cut the yarn generously and leave long tail for sewing.
Crochet the Owl Beak
The owl beak is crocheted in spiral rounds with single crochet stitches. Alternatively you can stitch on a beak instead of crocheting it and sewing it to the body.
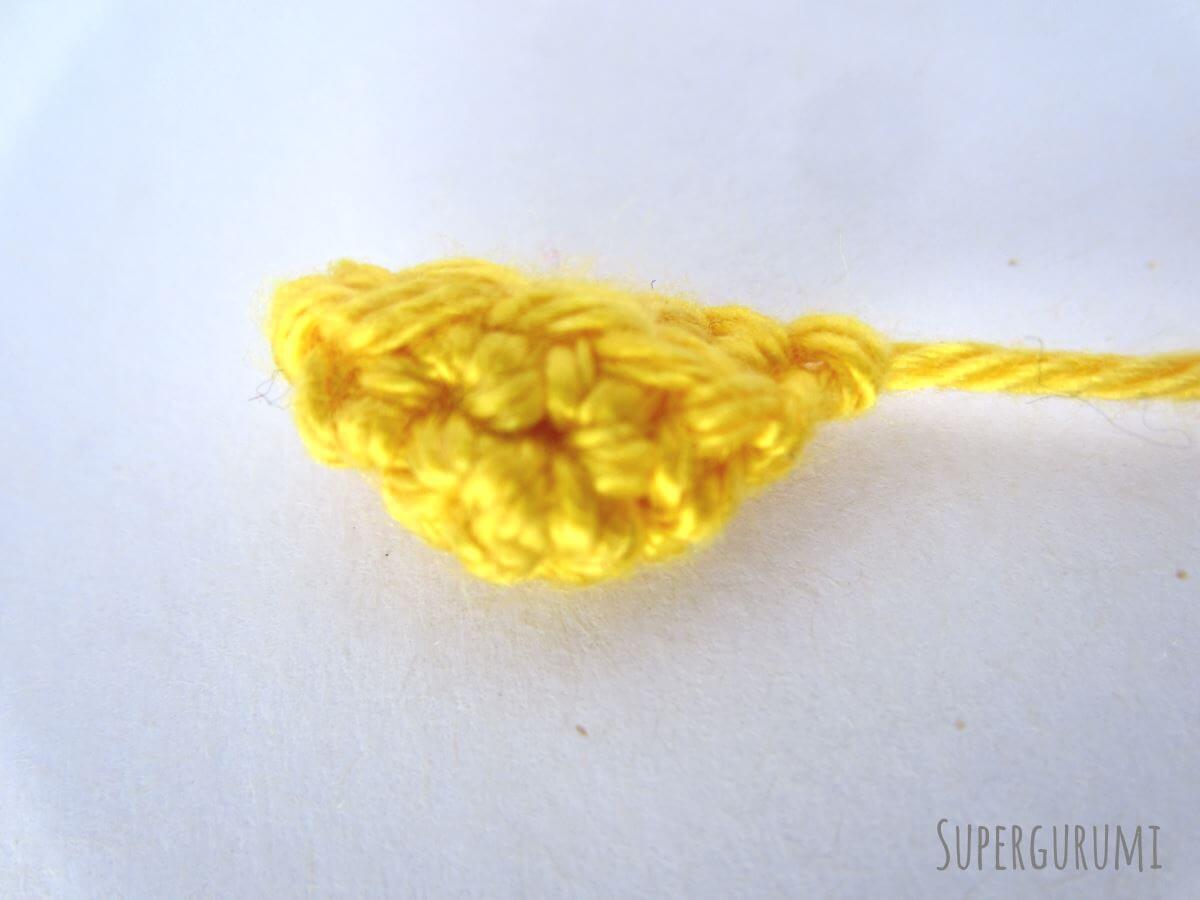
- You start making a Magic Ring using the yellow yarn.
- 1. Round: 4 SC into Magic Ring. (4 stitches)
- 2. Round: 2 SC into each of the next 3 stitches. 1 SC. (7 stitches)
- 3. Round: [ 1 SC, 2 SC into next stitch. ] Repeat from [ to ] 3 times. 1 SC. (10 stitches)
- Cut the yarn generously and leave long tail for sewing.
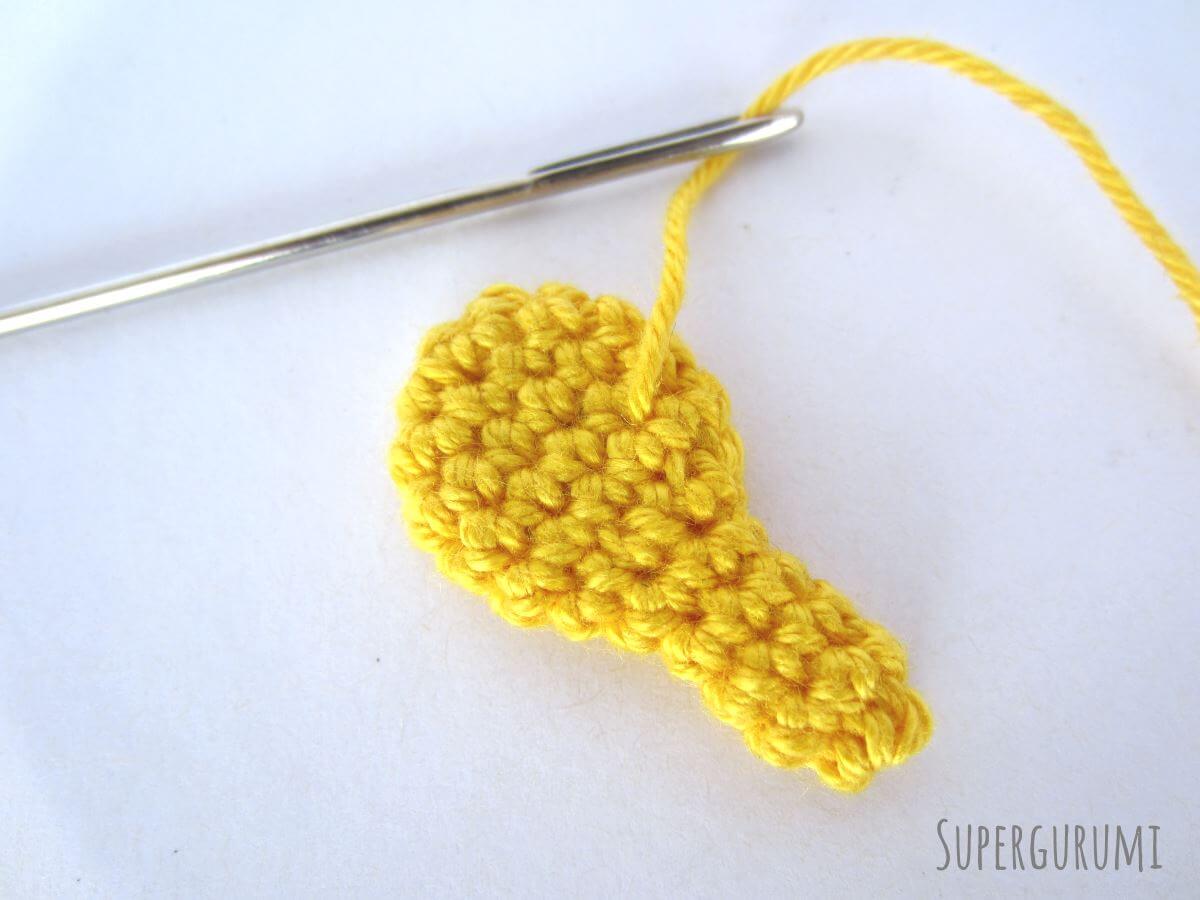
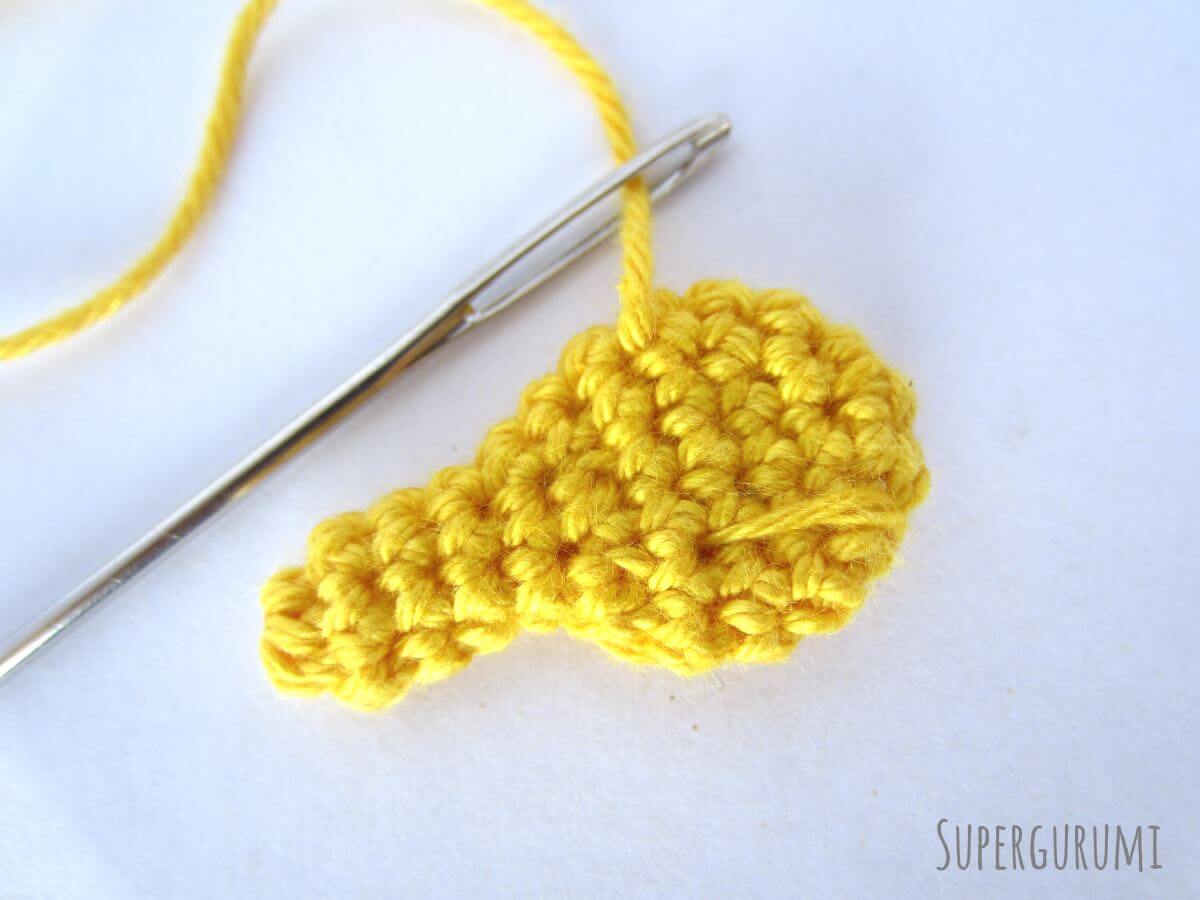
Crochet the Owl Feet (2 pieces)
The owl feet are crocheted in spiral rounds with single crochet stitches. How to stitch on the “toes” will be explained later. Crochet 2 toes.
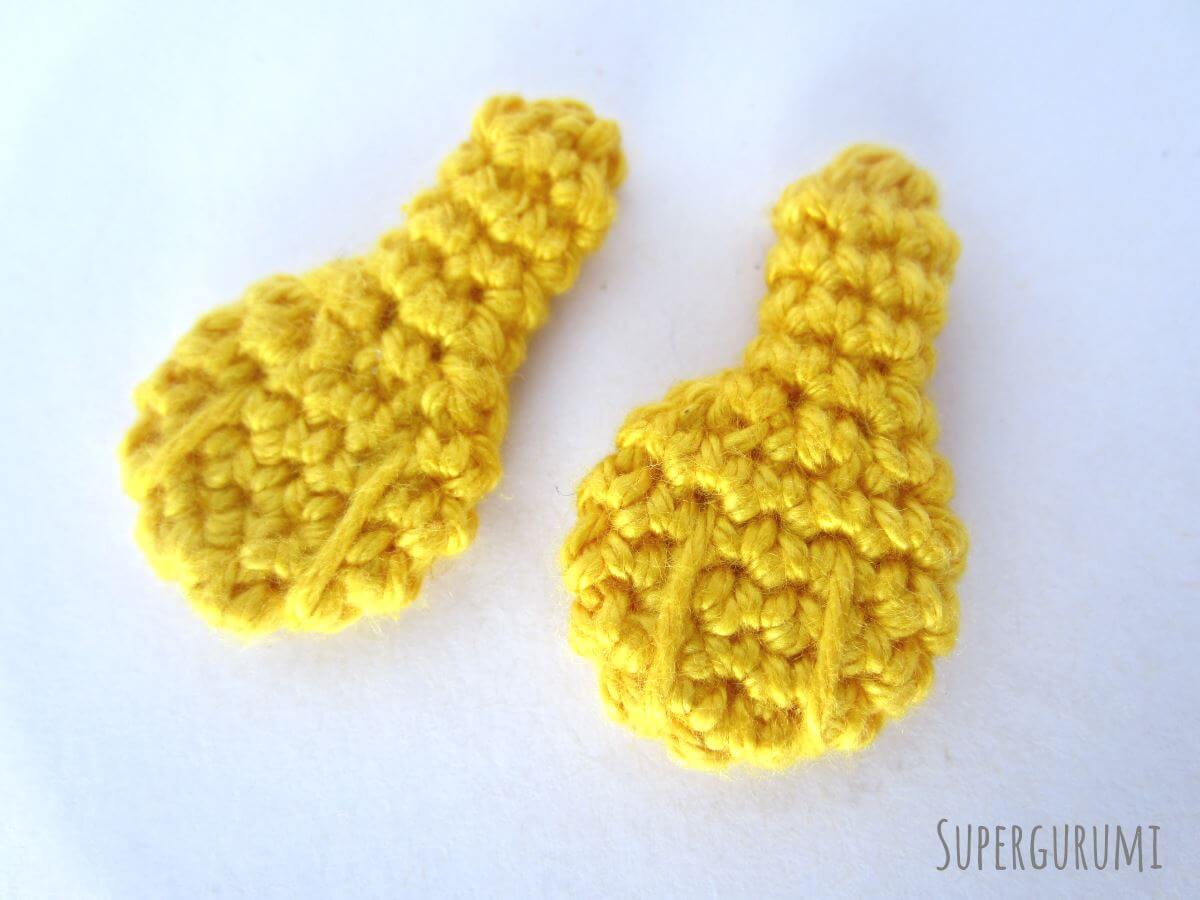
- You start making a Magic Ring using the yellow yarn.
- 1. Round: 6 SC into Magic Ring. (6 stitches)
- 2. Round: [ 2 SC into each stitch. ] Repeat from [ to ] till end of round. (12 stitches)
- 3. – 6. Round: 4 rounds, each round 12 SC. (12 stitches)
- 7. Round: [ SC 1st and 2nd stitch together. ] Repeat from [ to ] till end of round. (6 stitches)
- 8. – 11. Round: 4 rounds, each round 6 SC. (6 stitches)
- Close the opening, cut the yarn generously and leave long tail for sewing.
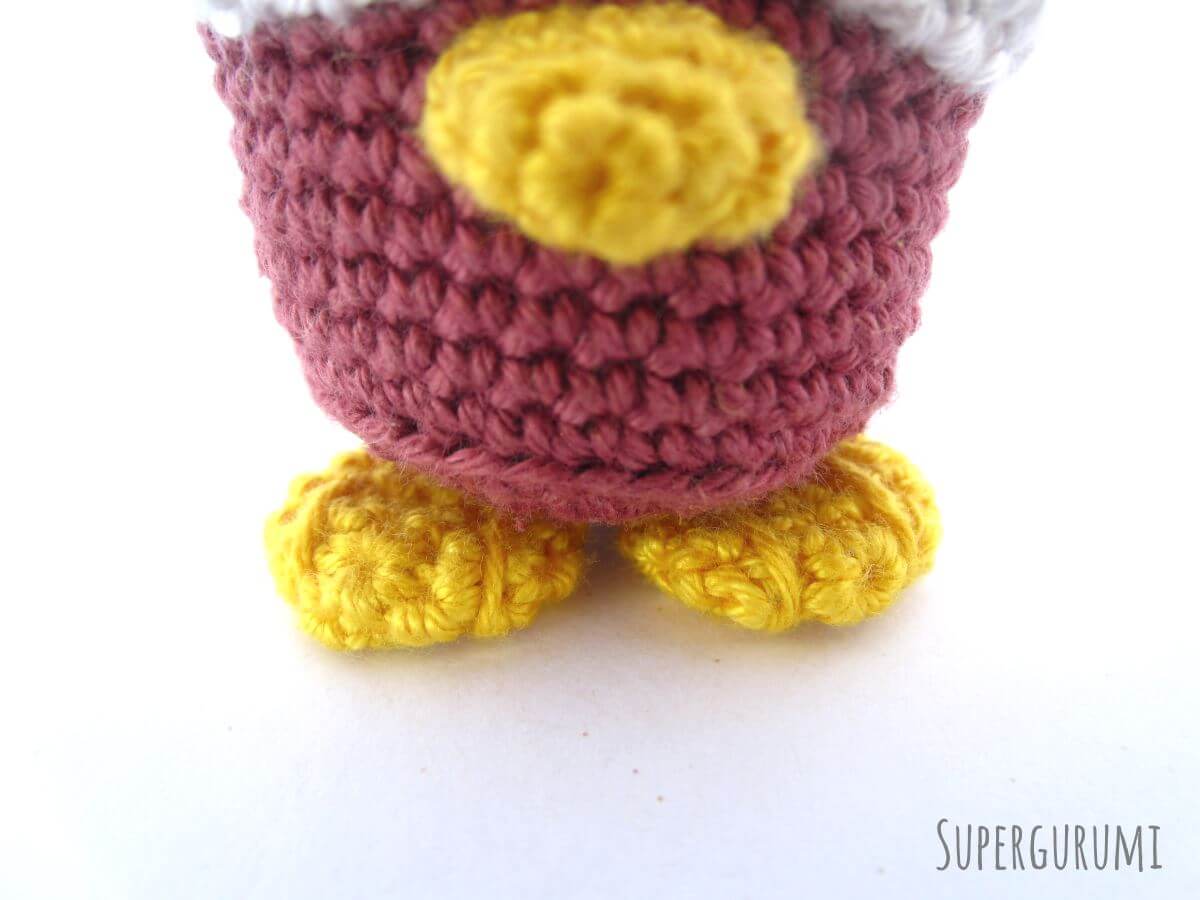
Press both crochet pieces together, that they lay flat in front of you. Hold the thread hanging from the feet with your tapestry needle and push the tapestry needle through close ending of the feet and let it escape through the wider part of the foot (see picture). Pull the thread over the edge of the wider foot part where you want to create one toe. Stitch the tapestry needly on the backside again through the wide foot part and let it again escape through a stitch that will be the second toe. Again, pull the thread over the wide part to form the second toe, stitch it through the feet again and let the thread escape through another stitch, pull it tight and cut the thread close to the feet to let it dissapear inside the foot.
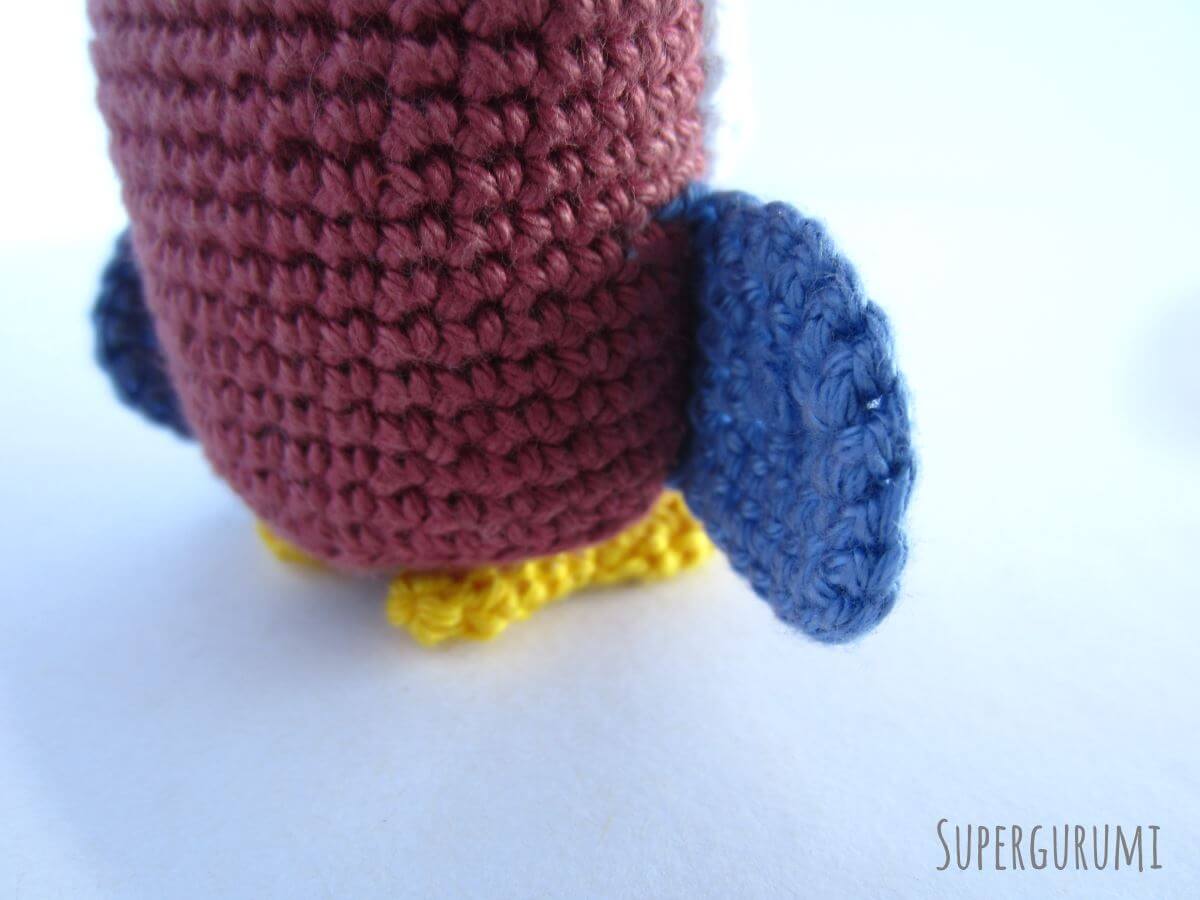
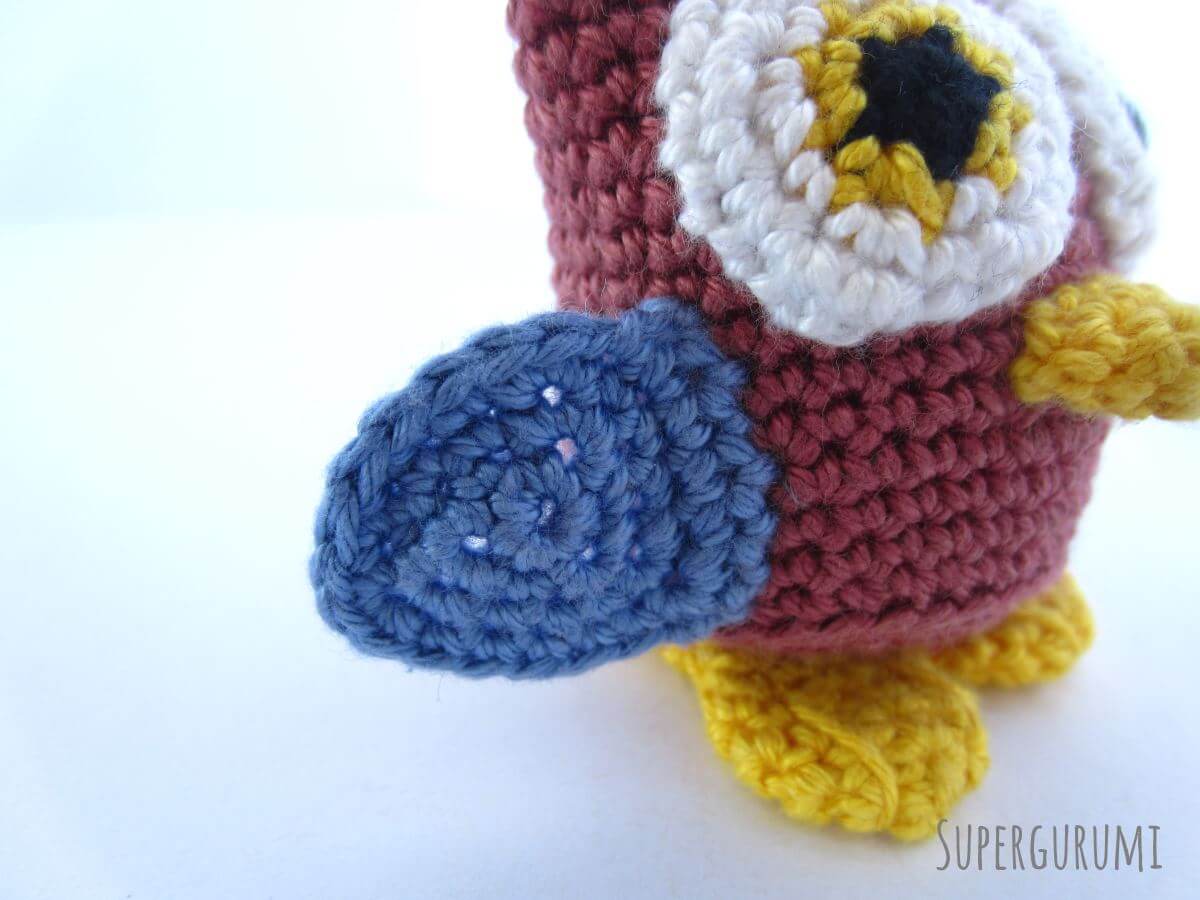
Crochet the Owl Wings (2 pieces)
The owl wings are crocheted in spiral rounds with single crochet stitches. Crochet 2 owl wings.
- You start making a Magic Ring using the blue yarn.
- 1. Round: 6 SC into Magic Ring. (6 stitches)
- 2. Round: [ 1 SC, 3 SC into next stitch. ] Repeat from [ to ] till end of round. (12 stitches)
- 3. Round: [ 3 SC, 3 SC into next stitch. ] Repeat from [ to ] till end of round. (18 stitches)
- 4. Round: [ 5 SC, 3 SC into next stitch. ] Repeat from [ to ] 2 times. 5 SC. (22 stitches)
- Cut the yarn generously and leave long tail for sewing.
Finishing the Crochet Owl
After finish crocheting all the owl parts it is time to assemble them. Since the body and head are already finished and closed you start sewing on the eyes.
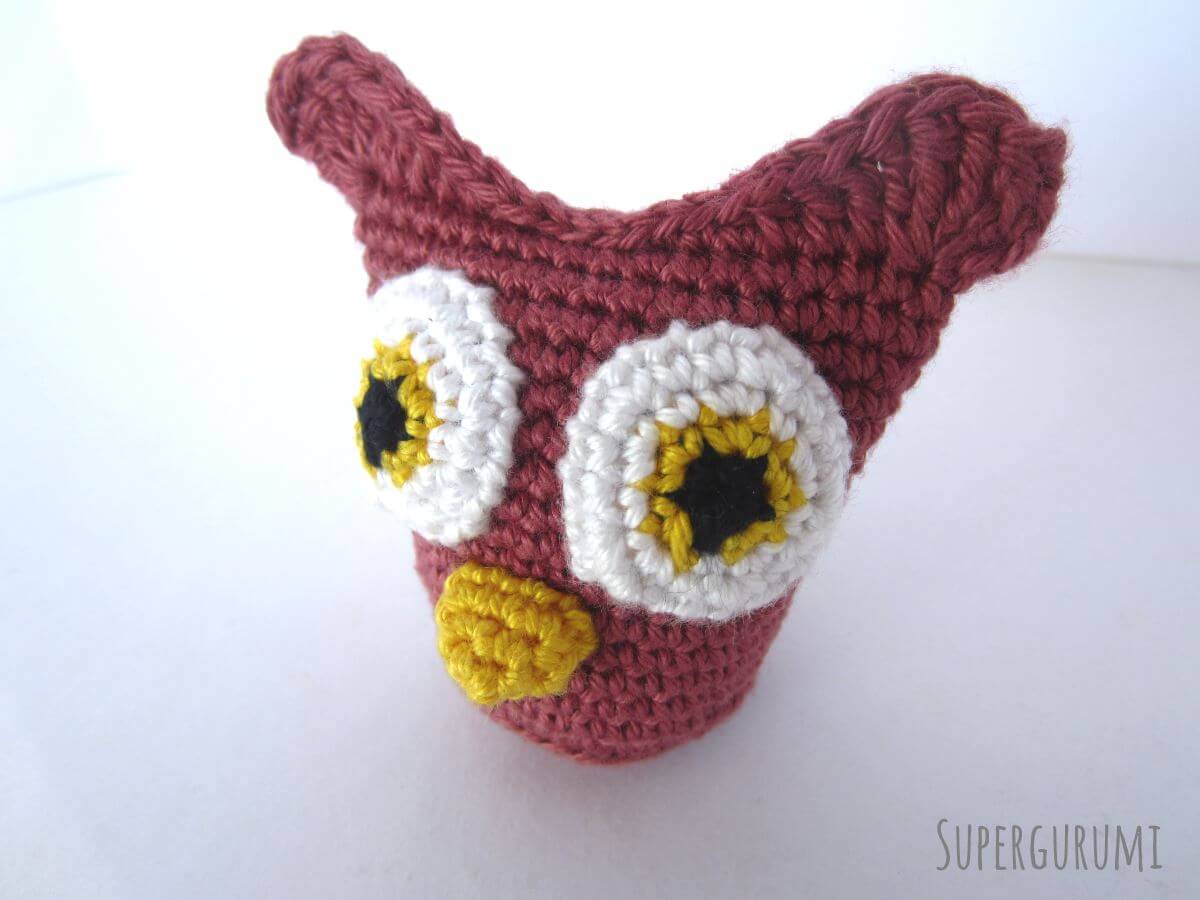
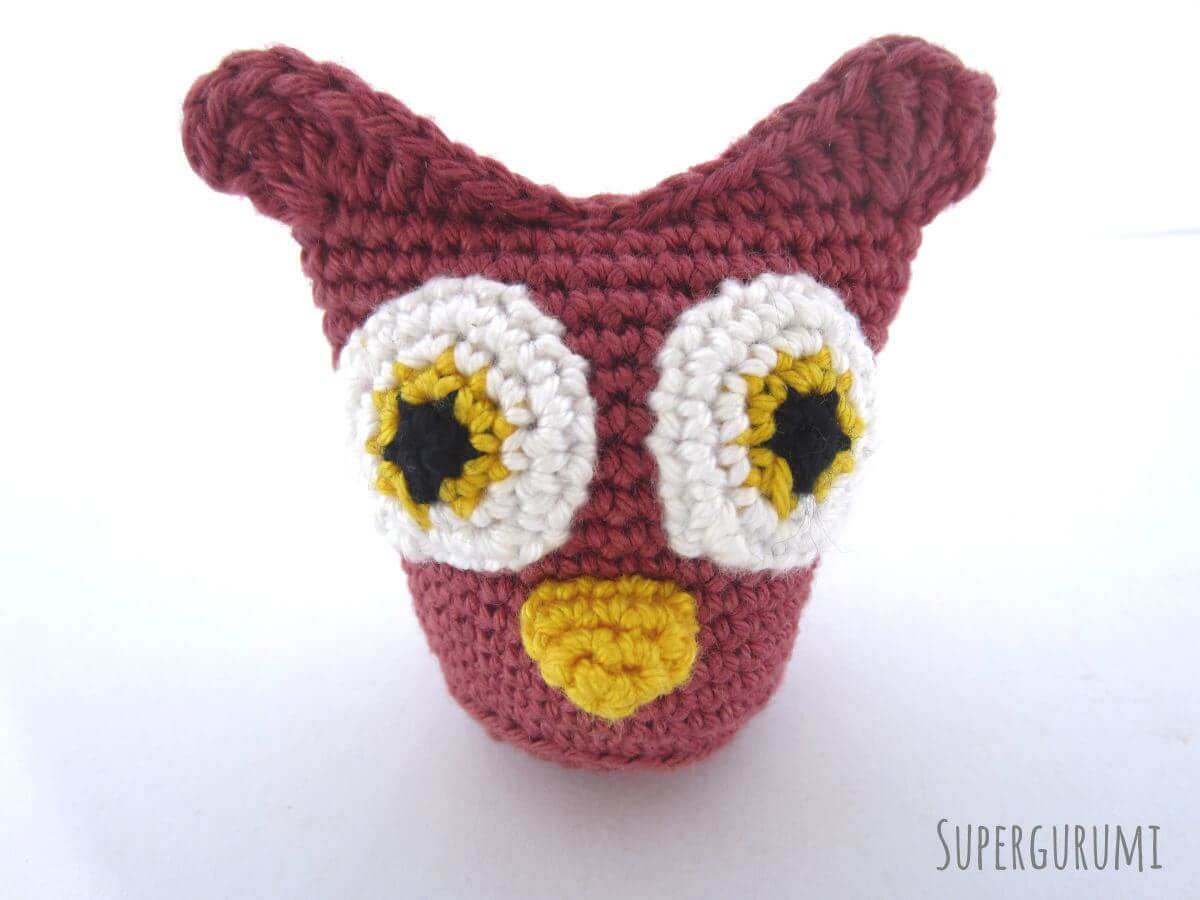
Eyes: Both sides of the owl body should look very similar why it is up to you to decide what will be the front and what will be the backside of the body. Start sewing on the eyes approximately 2 stitch rows under the “head feathers” (the closed head part). Use the pictures as guidance for a good position.
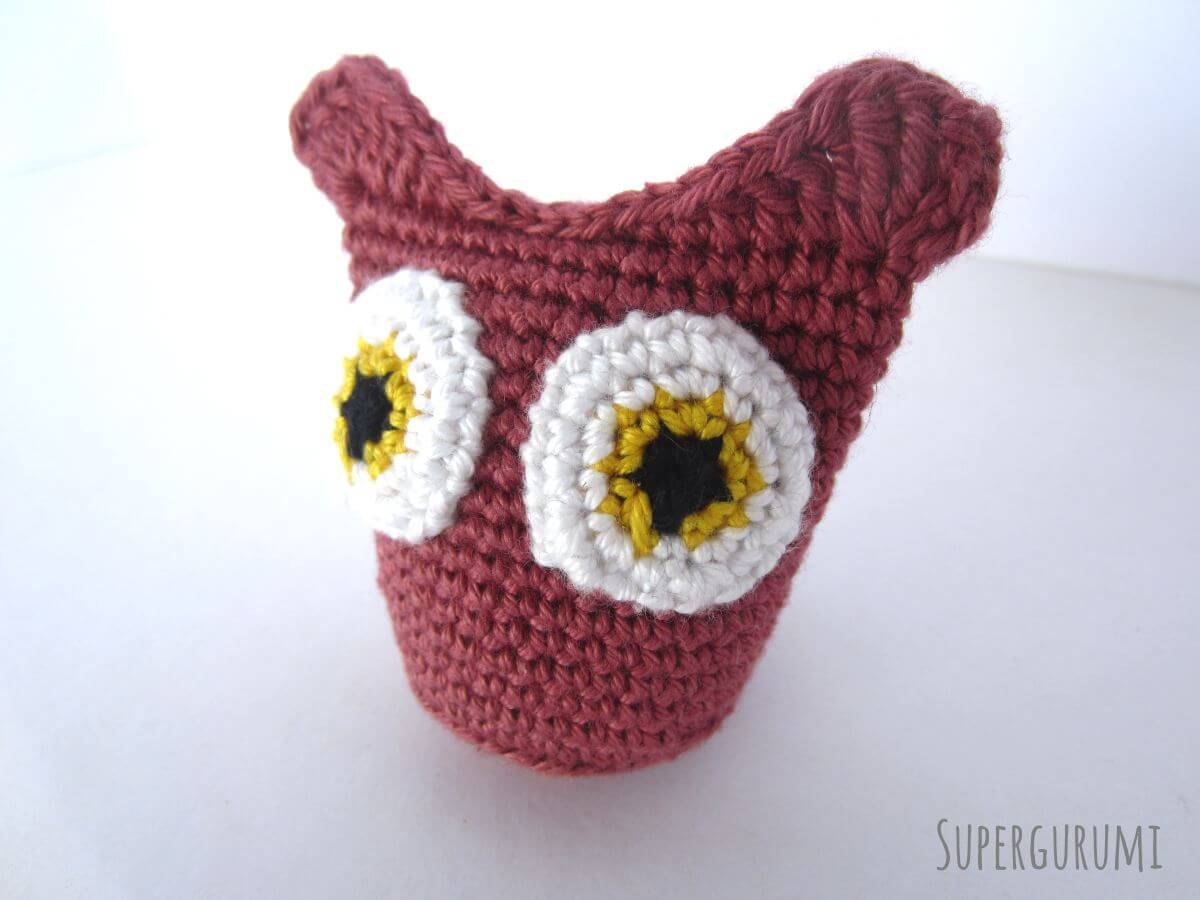
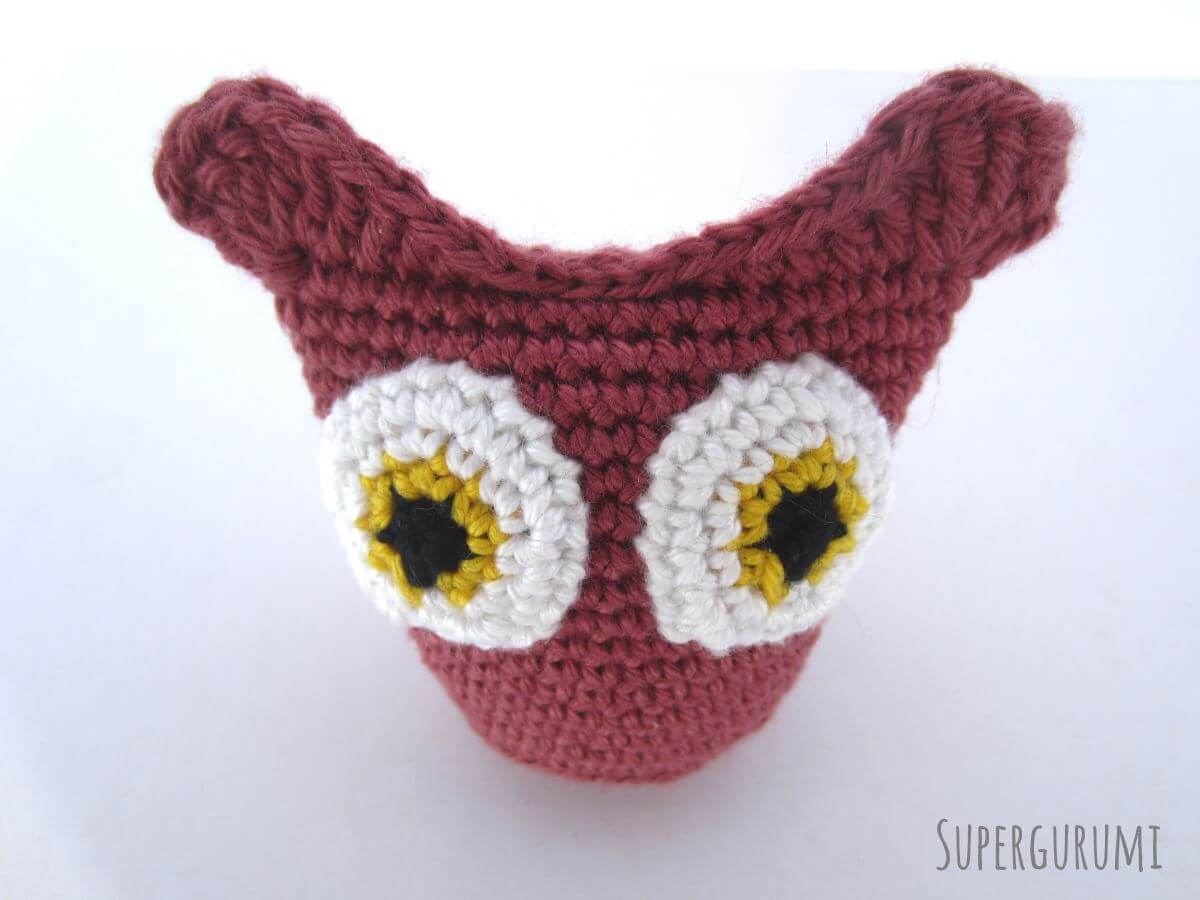

Beak: First press the beak together that the thread will be most right of the beak. Now sew on the upper part of the beak between the eyes. It should be enough to sew on only one part of the beak to the body. Again, use the pictures as guidance to position the beak correctly.

Feet: Take a yellow thread and simply knot the feet to the bottom of the owl body. Use the pictures as guidance to position the feet correctly.

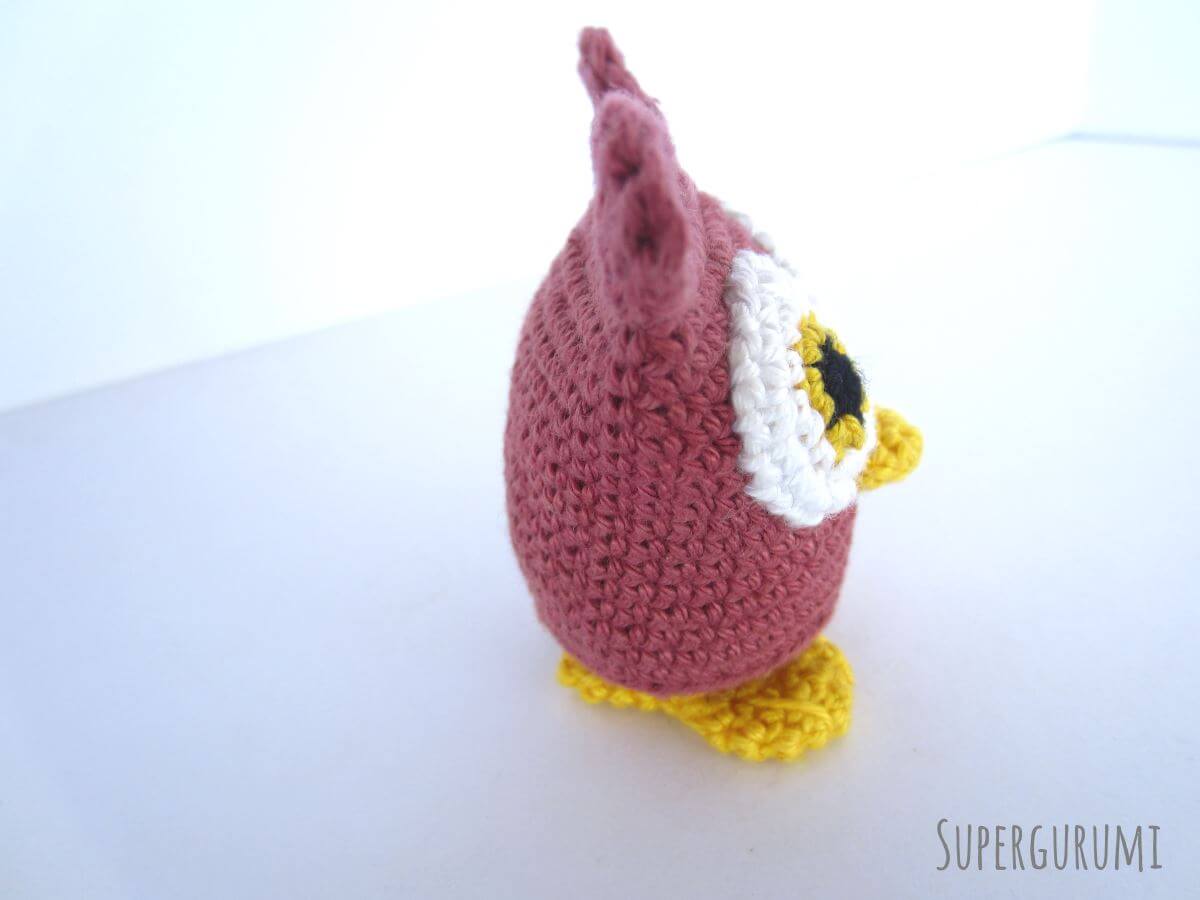
Wings: Finally sew on the wings to the body. Sew the wings left and right of the body just near the eyes. Sew the wings to the body with the last 5 crocheted stitches on the wings. Doing so let you move the wings open or close. Use the pictures as guidance to position the owl wings correctly.

Done is your own Amigurumi crochet owl, cozy and care-free!